If anyone has ever said that blockchain is the new type of database, then believe me he is absolutely incorrect. Blockchain is not meant to store a large volume of data nor it has any traditional architecture of the database. It is a full ecosystem and one of the key features is the storage of transactions in blocks through distributed ledger technology. This is the reason why you should not put all kinds of data on the blockchain otherwise it will be bloated. Instead, you can put the referential data on the blockchain with very important transactions that need to be monitored in terms of immutability or provenance.
Another difference between the two is, blockchain only appends new data by connecting it with its history, while database only updates the existing data and does not give you the genesis of the record. So in blockchain world, when we have a large volume of data then we must decide which data should be the part of blockchain and world data or database.
Decision making in Off-Chained or On-Chained Data
There are two types of data categories in any blockchain’s Ecosystem.
1) Transaction or Record (That should be stored on the Distributed Ledger of the blockchain). This data is irreversible, immutable and always maintain the history including the very first genesis data or block. This data is called On-Chained Data.
2) World Data or record is the information which is not directly stored on the blockchain. This data resides outside the blockchain network and can be stored in large size. Such data is also called “Off-Chained Data” and its referential transaction data can be stored on the blockchain as “On-Chained Data”.
It is essential to understand not all data must be written on the blockchain otherwise your blockchain network will become bloated. Which means you should know the difference between the off-chain and on-chain data.
Example how a landlord and tenant dApp can segregate the data
Let’s suppose if there is an application where tenants and landlords make monthly transactions. So the tenant wallet would transfer some security tokens as a rent payment to the landlord. On every new transaction, smart contracts will validate the transaction before sending it on the blockchain.
For such DApp we will consider, the tenant/landlord name, ids, profile, photographs, scanned copies of identity cards or documents, address, etc to be stored off-chained. So the all the big files and the redundant data does not need to be stored on the blockchain. Off-chained data can be stored either in the traditional databases or a distributed cloud storage services like StorJ https://storj.io or peer to peer hypermedia protocol IPFS https://ipfs.io .
The on-chained data could be the value of the monthly rent, payment transaction, timestamp, tenant’s unique identity and landlord’s unique identity. These on-chained data can be stored on the blockchain, where the unique ids of tenant and landlord will help us to find the world data or off-chained data.
Since smart contracts need to decide and validate if the data should be moved to the consensus, it is important for them to interact with the external data. Since blockchain is a blackbox and smart contracts reside inside the blockchain network cannot easily interact with the outside world, there are many services out there to simplify this process.
How to get off-Chained Data through the Chainlink Smartcontract.com
There is an Oracle service always required for the external data feed for the smart contracts. It makes it more complicated if you need your external data from different data sources. You might face testing and development issues to provide your DAPP’s external data to your smart contract.
But don’t worry there is an application available called Smartcontract.com developed by some great blockchain experts, who are providing smooth integration APIs that will connect your external data feeds with your smart contracts.
This application will provide middle wear called chainlink for any network like Ethereum or Bitcoin chain, and you can rely on these services to fetch your external data feed and insert them into the blockchain.
The exciting part is, you do not have to worry about how your off-chained data will be available to your smart contract nor you need to write your own oracle service.
The only thing you need to provide is a JSON format for such data and rest will be taken care by the chainlink middleware. The smartcontract.com is the best place to test your smart contract condition if you want to simulate real practical data feed with the logic of your smart contract.
Now let’s create the same scenario on the smart contracts where let’s suppose our application “MyRentApp” will generate the JSON format with such data like tenant id, landlord id, paid amount, rent for the number of months, etc. But some of this data will be saved on the blockchain while other will be used just in the decision-making situation of the MyRentApp’s smart contract.
Data fetching simulation by Chainlink
1 – Visit the http://testnet.smartcontract.com and signup a new account. Since we will try to simulate this communication, so we will use the testnet.smartcontract.com. You have to create the test account separately even if you had created the non-test account.
2 – Login and you will see the dashboard screen with a green button with the caption as “Create Contract.”
3 – Select the Bitcoin or Ethereum Network Chainlink, whichever suits your requirement. In this example, we will use the Ethereum network.
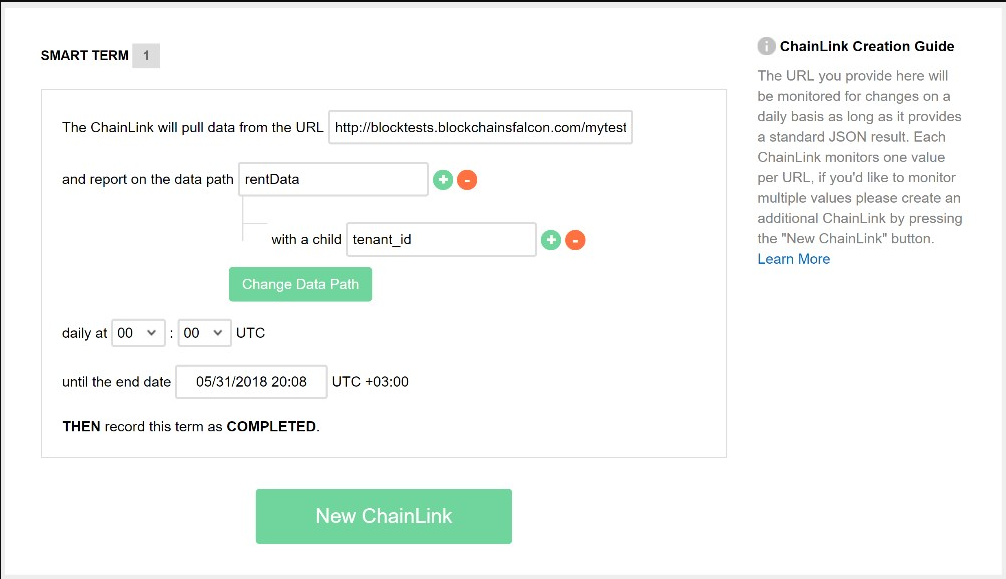
4 – Now a new form will appear with some fields including the Pull URL field.
5 – Your app must have a JSON data URL, which you can pass inside. Remember this is URL will be the communication channel between your app and smart contract. In the JSON data, you can put value tenant id, landlord id, amount, etc. For
For the testing purpose, I have created this link http://blocktests.blockchainsfalcon.com/mytest1.php

Smartcontract.com
6- Now click the data path and select the appropriate parameter, e.g. in our case we will choose the tenant id, landlord id, amount and duration attributes. In the above term, we have selected only one item. To select rest of the things you should click “New ChainLink” and add the same URL with the required attributes.
7 – You can put the duration when ChainLink should stop monitoring and pulling the JSON data from your application.
8 – Add some description about your smart contract, and also you can add any further attachments if required.
9 – Now finalize the contract and sign it.
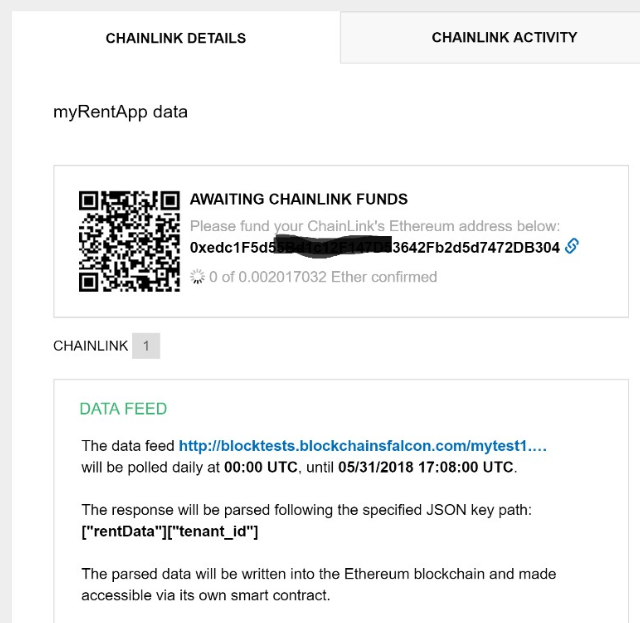
10 – A new screen will appear with a QR code, Ethereum address, and the amount which you must pay some funds to publish it on the Ethereum network.

13 – Since we are on the testnet, we can use MetaMask chrome plugin or brave’s plugin to test some Ethereum based transaction on the Ropsten Test network.
14- First, You must buy some test ETH and send them on the Chainiklink’s Ethereum address. But don’t worry it is a testing platform so you can just simulate the buying and sending process through MetaMask.
14 – Once you will pay the ETH through MetaMask, you will see the Data Feed information and Integration information.
Congratulation you have created your first ever data fetching feature from your application to your smart contract. This concept can be expanded with broader use cases since my article purpose is to introduce you the basic understanding of the smart contract and external data usage. I hope this will open the door for you to test and go into more depth in future.


